Using your own VPS, in this article you’ll learn how to do your own website hosting with free SSL which can last up to 15 years before expiring. In this setup we’ll be using Traefik, docker and CloudFlare as domain provider.
This is the second article in the series of, shipping software for small business, and if you missed out the first article on how to acquire, and secure, your own VPS then head over there first.
What we’ll be shipping
Below is Traefik dashboard rendering in with valid SSL on an internet exposed domain. This article will guide you through how to achieve that and verify your setup by deploying a simple web site through using our proxy.
Moreover, using Traefik, allows you to deploy more complex web apps, and in fact we use it to deploy our own web apps, such as MessageCommander, so lets get started.

What you will learn
- Set up CloudFlare DNS with your own domain
- Create neccessary certificates
- Setup Traefik using docker
- Verify your SSL setup
Set up CloudFlare DNS with your own domain
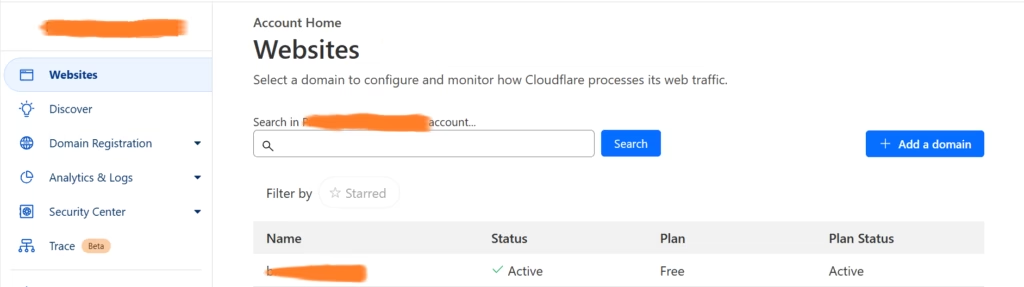
First, head over to CloudFlare and, if you have not done already, register a user to buy yourself a domain that you wish to have. Once there you’ll see your domain listed under Websites just like below.
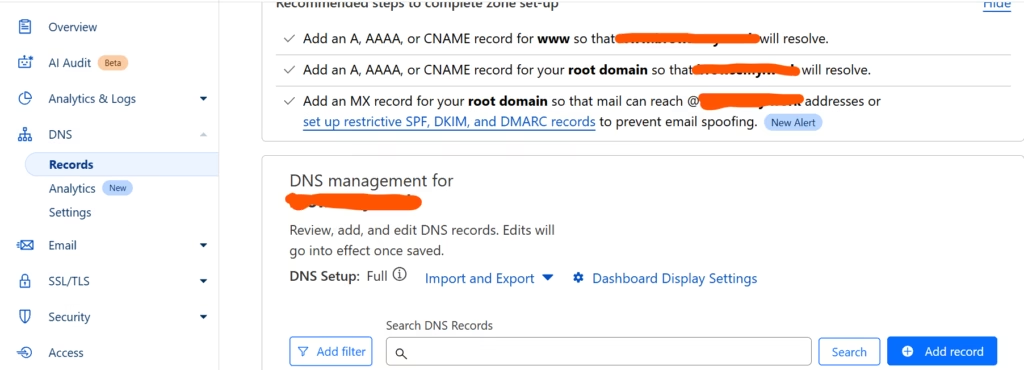
Click on your domain and navigate to DNS section as depicted below.
Hit the Add record button make it so that your domain name points to your server IP address. Similar to the below

However make sure to swap out 1.1.1.1 with your servers API address. Once done, let’s see how we can make some certifcates.
Creating our certificates
Second, head over to SSL/TLS section and make sure to configure your SSL/TLS encryption to be set to full (strict)

For good measure, navigate to Edge Certificates section and visually confirm that they have been created by default.
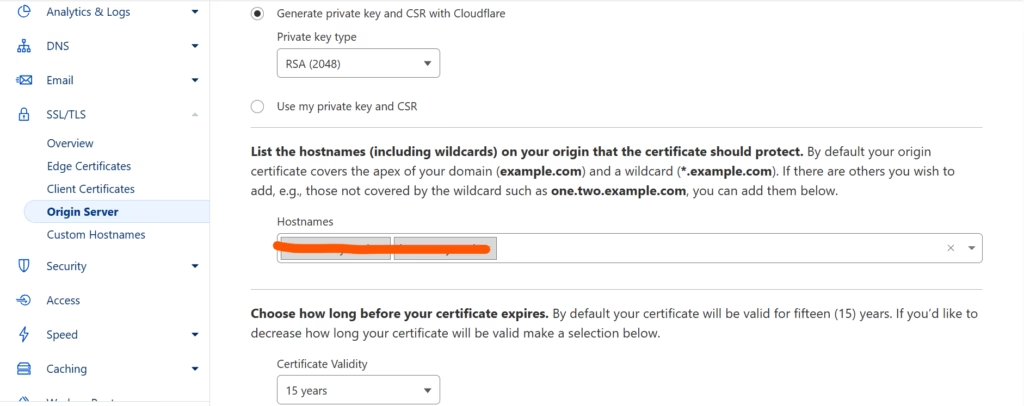
Confirming that, proceed to Origin Server section and click on Create certificates button and, once there, I’ll assume that you do not have your own CSR / private key and thus will opt for CloudFlare to create one for you.
Make sure to opt in for 15 years certificate validity and, unless you have specific hostnames you wish to constrain to, leave the default list of hostnames be. You can always get back and change this later if needed.
Your end result should look something like this
Click Create button. On the next screen you should see both your certificate and your private key listed. Now do the following
- Copy your contents of your certificate into a file called certificate.pem
- Copy your contents of your key into a file called certificate.key
Feel free to choose your own names as you see fit as long as you store this information somewhere.
Great, now it’s time to connect to your server and prepare for Traefik set up. In this article we’ll be using Linux so the commands my vary from your OS. However, the docker syntax and structure should be the same.
Setup Traefik using docker
For this part of the configuration we’ll be using Linux with docker installed. You can use another OS but make sure you do have docker installed.
In addition, we’ll enable our docker engine’s swarm mode as this is a single computer and it really does not make any practical difference.
On your server, let start by making our directory structure, starting out with directory called traefik which will contain a subdirectory named certs.
mkdir traefik
cd traefik
mkdir certs
Furthermore, inside your traefik folder, using your favourite editor, create file traefik.toml which should look something like this:
[log]
  level = "ERROR"
  format = "json"
[accessLog]
  format = "json"
  [accessLog.fields]
    defaultMode = "keep"

  [accessLog.fields.names]
    "level" = "drop"
[entryPoints]
  [entryPoints.web]
    address = ":80"

  [entryPoints.websecure]
    address = ":443"

  [entryPoints.traefik]
    address = ":8080"

[http.routers]
  [http.routers.traefik]
    # won't listen to entry point web
    entryPoints = ["traefik"]
    rule = "(PathPrefix(`/api`) || PathPrefix(`/dashboard`))"
    service = "api@internal"

[http.middlewares]
  [http.middlewares.traefik-https-redirect.redirectscheme]
    scheme = "https"
  [http.middlewares.traefik-http-redirect.redirectscheme]
    scheme = "http"

[providers.docker]
endpoint = "unix:///var/run/docker.sock"
watch = true
exposedbydefault = false
swarmMode = true

[[tls.certificates]]
      certFile = "/etc/traefik/certs/certificate.pem"
      keyFile = "/etc/traefik/certs/certificate.key"

# enable web configuration backend.
[api]
  dashboard = true

## Static configuration
[serversTransport]
  insecureSkipVerify = true

[providers.file]
    filename = "/traefik.toml"
    watch = true
Save the file before proceeding to create docker-compose.yml. Here is my Traefik Docker Compose example:
version: '3.4'
services:
  traefik:
    image: traefik:2.2
    networks:
      - proxy
    ports:
      - 80:80
      - 443:443
    volumes:
      - /var/run/docker.sock:/var/run/docker.sock
    configs:
      - source: traefik-certs-key-config
        target: /etc/traefik/certs/certificate.key
      - source: traefik-certs-pem-config
        target: /etc/traefik/certs/certificate.pem
      - source: traefik-config
        target: /traefik.toml
    deploy:
      mode: global
      update_config:
        parallelism: 1
        delay: 10s
      restart_policy:
        condition: on-failure
      labels:
        - "traefik.enable=true"
        - "traefik.http.routers.traefik.entrypoints=web"
        - "traefik.http.routers.traefik.rule=Host(`traefik.example.com`)"
        - "traefik.http.middlewares.traefik-auth.basicauth.users=test:$apr1$rQF27wRn$DDBsnnFgjki6C2HR2.6As/"
        #- "traefik.http.middlewares.traefik-https-redirect.redirectscheme.scheme=https"
        - "traefik.http.routers.traefik.middlewares=traefik-https-redirect@file"
        - "traefik.http.routers.traefik-secure.entrypoints=websecure"
        - "traefik.http.routers.traefik-secure.rule=Host(`traefik.example.com`)"
        - "traefik.http.routers.traefik-secure.middlewares=traefik-auth"
        - "traefik.http.routers.traefik-secure.tls=true"
        - "traefik.http.routers.traefik-secure.service=api@internal"
        - "traefik.http.services.traefik.loadbalancer.server.port=8080"

networks:
  default:
    external:
      name: proxy

configs:
  traefik-certs-key-config:
    file: ./certs/certificate.key
  traefik-certs-pem-config:
    file: ./certs/certificate.pem
  traefik-config:
    file: ./traefik.toml
Finally, make sure to change domain name traefik.example.com to reflect your actual domain name.
Also to login to the traefik dashboard, you need to login with user test and password iwantmytraefik. If you wish to change this then use htpasswd command line tool to generate your new login credentials and replace the below line, in your docker-compose.yml, with the hashed credentials
- "traefik.http.middlewares.traefik-auth.basicauth.users=test:$apr1$rQF27wRn$DDBsnnFgjki6C2HR2.6As/"Furthermore, find back to the certificate and key file and copy them both into the certs folder on your server. Your file and folder structure should look like this now:
./traefik
├── certs
│   ├── certificate.key
│   ├── certificate.pem
├── docker-compose.yml
└── traefik.toml
In order to run our setup, we need to set our docker engine into swarm mode in order to leverage the some of the attributes in our docker-compose.yml file.
sudo docker swarm initFinally, all we have to do now is to create our docker network and run our service. The following two commands should take care of that
sudo docker network create -d overlay proxy
sudo docker compose up -d
Verify your SSL setup
Open your browser, navigate to https://traefik.yourdomain.com and log into your Traefik dashboard. Enjoy your free SSL.
In case your SSL does not seem to work, know that some times it needs a bit of time to propagate both your domain and SSL until the changes take effect.
If you need to troubleshoot, find and change the below setting in your traefik.toml file and restart your service.
level = "DEBUG"Recap and next steps
Thank you for following along this far. You now have your SSL setup and your reverse proxy is ready to take on web services thrown at it. Just remember to attach the web service to the proxy docker network, add a DNS record in CloudFlare, and everything else should be more or less automated.
In case you are looking for a quick start. Below is a simple service you can try out.
version: '3.4'
services:
  whoami:
    image: "traefik/whoami"
    container_name: "whoami"
    labels:
      - "traefik.enable=true"
      - "traefik.docker.network=proxy"
      - "traefik.http.services.whoami.loadbalancer.server.port=80"
      - "traefik.http.routers.whoami.rule=Host(`www.example.com`)"
      - "traefik.http.routers.whoami.entrypoints=web"
      - "traefik.http.routers.whoami.middlewares=traefik-https-redirect@file"
      - "traefik.http.routers.whoami-secure.rule=Host(`www.example.com`)"
      - "traefik.http.routers.whoami-secure.entrypoints=websecure"
      - "traefik.http.routers.whoami-secure.tls=true"

networks:
  default:
    external:
      name: proxy
Remember to change www.example.com to your domain and make sure you have a DNS record, in CloudFlare, set up.
Summary
Here is a summary of what you’ve achieved and learned.
1. Setting Up Cloudflare DNS
- Purchase a domain via Cloudflare if you don’t already have one.
- Configure DNS settings by creating an A record that points your domain to your server’s IP address.
2. Creating SSL Certificates
- Set Cloudflare’s SSL/TLS encryption mode to Full (Strict).
- Generate an Origin Server certificate with a 15-year validity.
- Save the generated certificate and key as certificate.pem and certificate.key for later use.
3. Setting Up Traefik Using Docker
- Install Docker and enable Swarm mode on your server.
- Create a directory structure (
traefik/certs/) to store necessary files. - Configure Traefik by creating a
traefik.tomlfile, defining logging, entry points (HTTP & HTTPS), and TLS certificates. - Create a docker-compose.yml file to deploy Traefik with Docker.
- Replace
traefik.example.comwith your actual domain in the configuration. - Secure Traefik’s dashboard with basic authentication, using
htpasswdto generate credentials.
4. Running the Setup
- Initialize Docker Swarm with
sudo docker swarm init
- Create a network and start the Traefik container with
docker network create -d overlay proxy sudo docker compose up -d
5. Verifying SSL Setup
- Access https://traefik.yourdomain.com to confirm SSL is working.
- If SSL does not appear immediately, allow some time for DNS propagation.
- Enable debugging by modifying
traefik.tomlif troubleshooting is needed.
6. Next Steps: Deploying a Sample Web Service
- Deploy a simple Whoami service to test the setup.
- Attach new services to the proxy network and ensure they have a corresponding DNS record in Cloudflare.
- Automation ensures that services automatically integrate with Traefik and SSL.
Thanks for reading! If you liked this article, consider subscribing to my newsletter for more articles that will teach you how to get most for your money 👇
RELATED POSTS
View all