Whether you’re looking for a way to do cheap static site hosting, or deploy a more complex web app, read on learn how shipping software for small business can be done in a safe and cheap way.
Popular platform choices, a price example and our target price for comparison
For good measure, it’s worth mentioning that there is nothing wrong with Vercel, or it’s pricing, as it seems to be somewhat in the same price range as other popular platforms out there that serve same purpose.
At the time of writing, you can see the outbound traffic prices below

In case we had a pro subscription, a $150 extra would be charged per TB, in addition to subscription fees, after our first, free of charge, TB has been spent. Let’s see how to effectively reduce this cost to a whopping ~$0.14 per TB starting with the first, of three articles in total, to learn:
- What we’ll be shipping
- What a virtual private server (VPS) is
- How to acquire one and what features to look for
- How to secure your VPS
What we’ll be shipping

We’ll be shipping, Traefik, an open-source Application Proxy that makes publishing your services a fun and easy experience.
Following this guide, you will be able to do cheap static site hosting, blogs or other kind of web apps you want. In fact, we use Traefik to ship our own web apps, such as MessageCommander so read on.
What is a virtual private server (VPS)
When you build a frontend project, you usually test it on your local machine (localhost). That’s great for development, but what if you want the world to see it? You need to put it on a server.
A VPS is like a dedicated workspace on a powerful, shared computer (a physical server) that’s managed by a hosting company. Instead of sharing all the resources and configuration with others (like a shared hosting plan), you get your own isolated environment. It’s like having a virtual computer all to yourself, but it’s hosted in the cloud.
Acquiring a VPS
There are many providers offerings VPS, what ever vendor you choose just make sure they offer SSH with root access.
For our web app, we’ll go with Contabo and stick with their smallest VPS below.
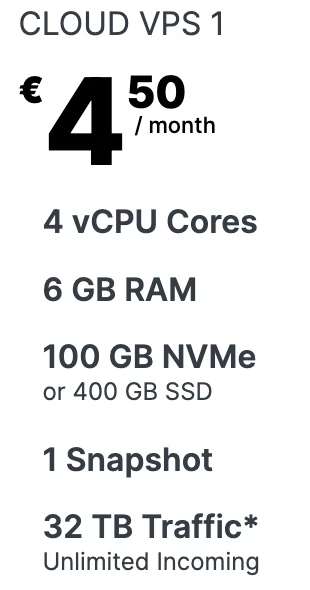
It can take a bit of time before your machine is provisioned, but once you receive message about machines being ready we’re good to go and ready to secure the newly acquired VPS.
How to secure VPS server
Find your root credentials and ssh into the new server by executing the command
ssh root@<your-vps-ip-address>Once inside you need to make a non-admin user account that you can safely use. Here is how you do this on a machine running Ubuntu Linux.
Creating a non-root user
Create a new user account with the adduser command.
adduser your_userMake sure to pick a good password and not that answering user information, prompted, is completely optional.
Once your user is created, we’ll need to add it to group of users allowed to execute commands with admin priviledge like so
usermod -aG sudo your_userGreat, now we switch to our new user like so
su - your_userAs the new user, let’s verify we’ve done right by executing following.
whoami && sudo whoamiYou will be prompted to enter your root (admin) password and, as a successful result, you should see two lines. First one should print out your new user’s name and the second should print out root.
Generate a secure key for future connections
For all future connections, we’ll be using a secure key and will not be typing in any password any more. As this is a very known, and documented, process I will instead link to external guides below:
Once you have your ssh key generated, we’ll copy it over to our VPS by executing the following command from a terminal
scp <user-home-dir>/.ssh/id_rsa.pub your_user@<vps ip>:~/.ssh/authorized_keysNeedless to say, swap out <user-home-dir> with the path of your users’ home directory along with the correct information for your VPS.
Once done we can verify by ssh into our VPS without needing to input the password.
ssh your_user@<vps ip>Great, now that this is taken care of, let’s secure our VPS further.
Securing our SSH server
Safely logged in, as non-root user, let’s start by backing up our existing SSH configuration like to
sudo cp /etc/ssh/sshd_config /etc/ssh/sshd_config.bakWe can now safely modify the ssh config, located at /etc/ssh/sshd_config, using your favorite editor.
Once inside, locate and make sure that the following values are set as follows.
- PermitRootLogin no – This will prevent a potential attacker from logging into your server directly as root.
- MaxAuthTries 3 – limit the maximum number of authentication attempts for a particular login.
- PasswordAuthentication no – having configured SSH keys for authentication, rather than using passwords, disable SSH password authentication to prevent leaked user passwords from allowing an attacker to log in.
Those are the most important one to set and, once done, it’s time for us to verify that we have a valid configuration before we apply this. This is easily done by executing the following
sudo sshd -tIf your configuration file has a valid syntax, there will be no output. In the event of a syntax error, there will be an output describing the issue.
Applying and testing the configuration
Once we’re satisfied with the configuration, and we have verified it, we can apply it by executing the following command
sudo systemctl reload sshd.serviceConfiguring our firewall
Before we start, as a word of caution; double check the firewall rules before logging out to make sure to not shut yourself out.
Now we’re going to turn on our firewall and make sure we only expose ports for HTTP/HTTPS traffic and SSH.
Moreover, we’re assuming the firewall to be disabled, by default, and rule set to be empty. Finally let’s get our firewall operational by executing the following chain of rules.
Making sure the firewall is off and disabling all traffic in
sudo ufw disableNow let’s make a default rule to deny all incoming traffic and allow all outbound traffic like this
sudo ufw default deny incoming
sudo ufw default allow outgoing
Right, now let’s make sure we’re able to connect to our server and that our server is able to serve HTTP/HTTPS traffic so lets make ufw allow http and https.
sudo ufw allow OpenSSH
sudo ufw allow 80
sudo ufw allow 443
Before enabling our firewall, double check the rules to make sure we’re allowed to login back. We can do this by executing command
sudo ufw show addedOnce verified, we enable our firewall like so
sudo ufw enableOnce enabled, assuming everything works as expected, concludes this article.
A look back at what we’ve done and what is next
You should now have learned:
1. Understanding VPS and Its Benefits
- A VPS offers an isolated, dedicated environment for hosting web applications, unlike shared hosting.
- It functions like a virtual computer in the cloud, providing better control and flexibility.
2. Acquiring a VPS
- Choosing a provider that offers SSH with root access is essential.
- Contabo is used as an example, highlighting a low-cost VPS option.
- After provisioning, users receive credentials to access the server.
3. Securing the VPS
- Creating a non-root user: Prevents direct root access, enhancing security.
- Setting up SSH key authentication: Eliminates the need for password-based login, reducing vulnerabilities.
- Securing SSH configuration:
- Disabling root login (
PermitRootLogin no). - Limiting authentication attempts (
MaxAuthTries 3). - Disabling password authentication (
PasswordAuthentication no).
- Disabling root login (
4. Configuring the Firewall
- Setting up UFW (Uncomplicated Firewall) to restrict access:
- Denying all incoming connections by default.
- Allowing only SSH, HTTP, and HTTPS traffic.
- Verifying and enabling firewall rules to prevent accidental lockout.
Head over to the next article in this series to learn how to setup your reverse proxy and deploy your first website.
Thanks for reading! If you liked this article, consider subscribing to my newsletter for more articles that will teach you how to get most for your money 👇
RELATED POSTS
View all

How to automate integration testing using docker
April 17, 2025 | by codeyourassets